Your here: Home / Network / Hardware Specific / Asus / RT-N11
 |
This article is a stub. Please help InfoDepot Wiki by expanding it, adding pictures, and improving existing text.
|
| File:Asus_RT-N11a.jpg |
NOTE: During configuration or flashing a device, the only that should be hooked to the device is the computer and power.
Specs[]
This section is in need of cleanup!
Platform
Serial Num. = ?
FCC ID = ?
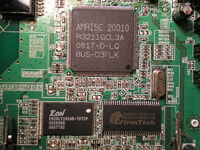
CPU Type = AMRISC 20010 R3211GCL3A 0813-D-LQ 8US-D3APA.1
MIPS Rev = ?
CPU Speed = ?
Bus = ?
Flash Type = Parallel
Flash Chip = EON 29LV160AB-70TCP H21110A 0802TSC
Flash Size = 2MB
Max Firmware Size = 1769472 bytes
RAM Size = 8MB
RAM Chip = Etrontech EM638165TS-6G
nvram Size = ?
Switch = IC IP175C LF 0811C13 FPU1274.1
Port-based vlan = ?
802.1q vlan = ?
Ethernet Port Count = 1-WAN 4-LAN
Wired Standard = IEEE 802.3?
boot_wait = ?
bootloader = ?
Flash Card Socket/Type = No
SD/MMC Mod Support = No
MiniPCI slots = 1
PoE = ?
Power = ?
Color of LEDs = ?
Size = ?
USB = No
Serial Port = Yes
JTAG Port = No
Supported by TJTAG/Version = ?
Special Features = ?
Radio
Wireless Radio = RT2760T GW68750E0 0806ST and RT2720L and RT9179A
WLAN DSP processor = ?
Antenna Connector Type = Fixed
Wireless Standard = IEEE 802.11b/g/n
WiFi Operating Frequency = ?
 802.11n = up to 150Mbps
 802.11g = 6, 9, 12, 18, 24, 36, 48, 54Mbps
 802.11b = 1, 2, 5.5, 11Mbps
Radio cor_rev = ?
Radio Capabilities = ?
Links of Interest[]
Flashing[]
Upgrading[]
Reverting[]
JTAG/Serial Info[]
JTAG[]
JTAG Pinouts[]
This section is in need of cleanup!
JTAG Recovery[]
This section is in need JTAG Recovery Instructions!
Serial[]
Serial Pinouts[]
This section is in need of cleanup!
Hyper terminal Setup in Windows XP[]
In Windows XP, Click Start Button - All Programs - Accessories -
   Communication - HyperTerminal
Enter a name for the connection, Click ok
Choose com port you adapter is plugged into, Click ok
Set:
 Bits per second = 115200
 Data Bits = 8
 Parity = none
 Stop bits = 1
 Flow control = none
Click ok
Click File - Save As, and select a place to save it to so you
             don't have to enter the settings again.
Putty Setup in Windows XP[]
After installing putty, run it
 Serial line = The COM port your using for serial (ie. COM3)
 Speed = 115200
Click on Serial under Connection
 Serial line to connect to = same as above (Serial line)
 Speed (baud) = 115200
 Data bits = 8
 Stop bits = 1
 Parity = None
 Flow control = None
Click Session
 Enter a name for your connection under saved sessions
Click Save
Click Open
Serial Recovery[]
This section is in need of Serial Recovery Instructions!
vlan Info[]
Pictures[]
FCC Pictures[]
Notes[]
Hardware Modification[]


