Your here: Home / Network / Hardware Specific / D-Link / DIR-300 vB1
 |
This article is a stub. Please help InfoDepot Wiki by expanding it, adding pictures, and improving existing text.
|
| File:D-Link_DIR-300_vB1a.jpg |
NOTE: During configuration or flashing a device, the only that should be hooked to the device is the computer and power.
Specs[]
 This section is in need of cleanup!
Platform
Serial Num. =
FCC ID = KA2DIR300B1
CPU Type = Ralink RT3050
MIPS Rev = ?
CPU Speed = 320MHz
Bus = ?
Flash Type = ?
Flash Chip = ?
Flash Size = 4MB
Max Firmware Size = 3801088 bytes
RAM Size = 32MB
RAM Chip = Winbound W9825G6EH-6
nvram Size = ?
Switch = Ralink RT3050 (SoC)
nvram Size = ?
Port-based vlan = ?
802.1q vlan = No
Ethernet Port Count = 1-WAN 4-LAN
Wired Standard = IEEE 802.3?
boot_wait = ?
bootloader = ?
Flash Card Socket/Type = No
SD/MMC Mod Support = No
MiniPCI slots = No
PoE = No
Power = 5V/1.2A
Color of LEDs = ?
Size = ?
USB = No
Serial Port = 1
JTAG Port = No
Supported by TJTAG/Version = ?
Supported by dd-wrt as of = v.24 SP2 build 12729 - 2009/08/24
dd-wrt K2.4 Support = ?
dd-wrt K2.6 Support = ?
Special Features = clone of D-Link DIR-600 vB1
Radio
Wireless Radio = Ralink RT3050 (SoC)
WLAN DSP processor = Ralink RT3050 (SoC)
Antenna Connector Type = ?
Wireless Standard = IEEE 802.11b/g/n
WiFi Operating Frequency = ?
 802.11n = up to 150Mbps
 802.11g = 6, 9, 12, 18, 24, 36, 48, 54Mbps
 802.11b = 1, 2, 5.5, 11Mbps
Radio cor_rev = ?
Radio Capabilities = ?
Links of Interest[]
This section is in need of cleanup!
Overview[]
Hardware[]
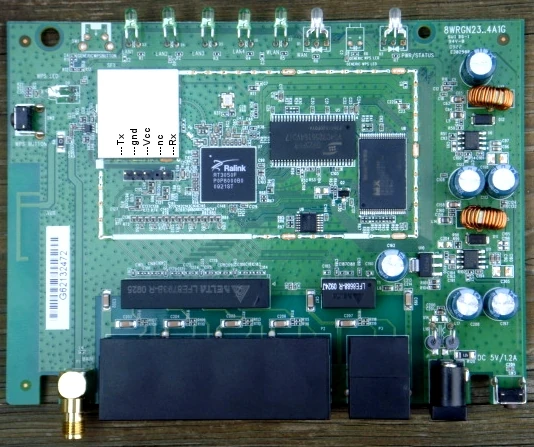
It is important to note, DIR-300 Rev A1 and Rev B1 are completely different hardware, different SoC, different procedure. So, if you have the old DIR-300 router, its install procedure is already well documented elsewhere. Rev B1 is based on Ralink RT3050 SoC and from all accounts, including Dlink's FCC test report, the PCBA is exactly the same as in the DIR-600.
You can tell which Rev of the hardware this router is from the box (it will say "H/W Ver: B1 F/W Ver 2.00" for example on the bottom of the box, underneath the barcode). A similar sticker with the hardware version and firmware version is also stuck on the bottom of the router itself. This means it's quick and easy to check the hardware revision before buying or borrowing it.
The factory default IP for this router is 192.168.0.1, user is "admin", password is blank.
Pros of this hardware[]
- 4 MB board, so no need to use "micro" DD-WRT builds.
- Fairly inexpensive.
- Fairly new hardware (released in 2009?), so it's widely available for purchase new.
- Reasonably fast CPU clock speed.
- Easy to install DD-WRT on this hardware (just flash through the web interface as per below, and you're done).
- According to Ralink's website, the chip has a ROM built-in and this means there is no boot code to crash or mistakenly erase. The ROM contains a bootloader and emergency room web page to recover flash firmware. Translation: You're unlikey to brick it.
Cons of this hardware[]
- This Ralink hardware does not support Client Bridge wireless mode ( reference ). It does however support Repeater Bridge mode, which is similar, but a bit more complicated to set up.
- No USB port, so cannot be a NAS for a USB drive, nor can it be used for Printer Sharing of a USB printer.
- As it is Ralink chipset based, support by DD-WRT is still limited in terms of firmware builds availability and community support compared to Broadcom based routers. Currently the only build from BrainSlayer doesn't include JFFS/CIFS client support.
- The LAN Port based VLAN is not supported. You can not assign the LAN Ports with VLAN. However, there may be a workaround for VLAN support on the DIR-600.
Flashing[]
Step-by-step instructions from out-of-the-box factory firmware[]
To install dd-wrt on either a D-Link DIR-300 Revision B1 or a D-Link DIR-600 Revision B1, you need to flash it directly from the router's web admin page (yes, that is correct... from D-Link's standard web interface). These are the steps to follow:
- Download the latest firmware from: http://dd-wrt.com/site/support/router-database , and enter the model as DIR600 or DIR300 as appropriate. There will be two files, "dlink-revb-factory-webflash.bin" and "dir600-revb-ddwrt-webflash.bin" / "dir300-revb-ddwrt-webflash.bin". You only need the factory-webflash file.
- Connect to the DIR-600/DIR-300 using an ethernet cable.
- Open http://192.168.0.1/ in your web browser, which should open the DIR600's/DIR300's administrative page from the standard D-link firmware.
- The D-link's default login details are user "admin", password is blank, and type the captcha from the image.
- Maintenance -> Firmware Update
- Click "browse" button -> select the "dlink-revb-factory-webflash.bin" file -> click "Upload" button.
- Wait 2 or 3 minutes for the DIR-600/DIR-300 to flash and do the update. (it should have finished when your browser tries to connect after the reboot, and probably fails because the IP address has changed). After the flash & update is done, the router will reboot to dd-wrt, and the IP address will have changed to 192.168.1.1. There is no need to do any reset.
- Open http://192.168.1.1/ in web browser. Will probably have to update your IP address (if using static IP) to this subnet to be able to connect. This should open DD-WRT's web interface. Configure DD-WRT as desired.
- You're finished!
Alternate Install Method using Emergency Room Web Interface[]
- Setup your PC with static IP on 192.168.0.0 subnet.
- Make sure the PC has the following two files:
- dlink-revb-factory-webflash.bin
- dir300-revb-ddwrt-webflash.bin (or the 600 equivalent, depending on whether you have the 300 or 600)
- Open your web browser and get it ready to connect to 192.168.0.1.
- Press and HOLD the reset button on the router and connect power. Hold the reset button for about 3~5 seconds, then release.
- Connect the browser to http://192.168.0.1/ . The Emergency Room Updating Firmware screen should display.
- Browse to and upload the first image file, the 'factory' one.
- When you see the message "IMAGE UPLOAD SUCCESS", the flash will begin to be erased and re-written.
- Wait until the power LED turns to solid 'Yellow'. At this point, the initial dd-wrt image has been written to flash, the device has rebooted and is running.
- Change the IP address of your PC to the 192.168.1.0 subnet. Use your browser to connect to the router at http://192.168.1.1/
- The DD-WRT screen should load. If not, you did something wrong. Go back and try again.
- There is a report that "emergency room web interface" may not support IE8, so if it does not work then try another browser: "Note that Internet Explorer 8 did not work for me on the emergency room web interface. It gave me a general page view error during the firmware upload. I had to use another browser to make it work (I used chrome but fire fox would probably work as well)."
Upgrading[]
- Download the latest firmware from: http://dd-wrt.com/site/support/router-database , and enter the model as DIR600 or DIR300 as appropriate. Download the new firmware file, which will be called dir300-revb-ddwrt-webflash.bin or dir600-revb-ddwrt-webflash.bin , depending on your router.
- Open the DD-WRT's web interface in your web browser. It's http://192.168.1.1/ by default.
- Administration tab -> "Firmware Upgrade" button
- click "browse" button -> select the "dir600-revb-ddwrt-webflash.bin" file -> click "Upgrade" button.
- It takes about 1 and a half minutes to upload and write the flash. Your browser will reload and let you know when it is done.
- It is probably a good idea to reboot after updating. That's it.
Reverting[]
To get back your D-Link DIR 600 router to its original D-Link firmware:
- Download the latest firmware version from Dlink (version 2.01 at time of this writing) from ftp://ftp.dlink.cz/dir/dir-600/driver_software/
- Use the "emergency room interface" steps described above.
- Do NOT use the standard firmware upgrade procedure. Multiple people have reported that this does not work for restoring the D-Link firmware. Use the "emergency room interface" steps instead.
JTAG/Serial Info[]
JTAG[]
JTAG Pinouts[]
 This section is in need of cleanup!
JTAG Recovery[]
This section is in need JTAG Recovery Instructions!
Serial[]
Serial Pinouts[]
This section is in need of cleanup!
Hyper terminal Setup in Windows XP[]
In Windows XP, Click Start Button - All Programs - Accessories -
   Communication - HyperTerminal
Enter a name for the connection, Click ok
Choose com port you adapter is plugged into, Click ok
Set:
 Bits per second = 115200
 Data Bits = 8
 Parity = none
 Stop bits = 1
 Flow control = none
Click ok
Click File - Save As, and select a place to save it to so you
             don't have to enter the settings again.
Putty Setup in Windows XP[]
After installing putty, run it
 Serial line = The COM port your using for serial (ie. COM3)
 Speed = 115200
Click on Serial under Connection
 Serial line to connect to = same as above (Serial line)
 Speed (baud) = 115200
 Data bits = 8
 Stop bits = 1
 Parity = None
 Flow control = None
Click Session
 Enter a name for your connection under saved sessions
Click Save
Click Open
Serial Recovery[]
This section is in need of Serial Recovery Instructions!
vlan Info[]
- The LAN Port based VLAN is not supported. You can not assign the LAN Ports with VLAN. However, there may be a workaround for VLAN support on the DIR-600.
Pictures[]


FCC Pictures[]
This section is in need of cleanup!
Notes[]
This page also applies to the DLink DIR-300 Rev.B
How to reset the Router to initial DD-WRT configuration[]
If you forget the username or password, or if the configuration becomes really messed up, you can always clear all the non-volitile parameters by doing a 'factory reset'. To do this, with the router already fully booted, press and hold the reset button for 5~6 seconds and release. The router will boot back up and answer to 192.168.1.1 just as if it had just been flashed with DD-WRT.